Introduction
This blog will explain you how to export Google Sheets to CSV file. Google Sheets is the most powerful tool for managing data and the data can be integrated with other applications like CRM. You can upload the sheet data into the database. When you need a clean, structured data format and want share data into the readable format, you can export Google Sheets as CSV (Comma-Separated Values) files.
In this guide you will know what are CSV files, what is the need of exporting Google Sheets as CSV and how Google Sheets CSV export works.
What are CSV Files?
CSV is an acronym for Comma-Separated Values. A CSV file is a plain text file which stores data in a table format just like a spreadsheet but each value is separated by comma. CSV files are lightweight, easy to read and work with any software from Excel and Google Sheets. They are also used for sharing data without format issues.
Why Exporting Google Sheets as CSV is Needed?
- CSV files are universally compatible with applications including databases, CRMs and spreadsheet tools.
- CSV files are ideal for data imports. Many software accepts only CSV formats to import user data, contacts and records.
- CSV keeps only raw values, separated by commas to avoid formulas related issues.
- CSV files are light weighted, smaller in size and easier to share and upload faster.
- If you want to ensure clean data transfer without any formatting errors.
- CSV files are perfect for backups. They can be archived and kept as backup.
How to Export Google Sheets as CSV?
Steps to download Google Sheets as CSV -
- Open the spreadsheet in your Google Sheets.
- Go to File > Download > Comma Separated Values (.csv).
- Click on it to download in CSV file.


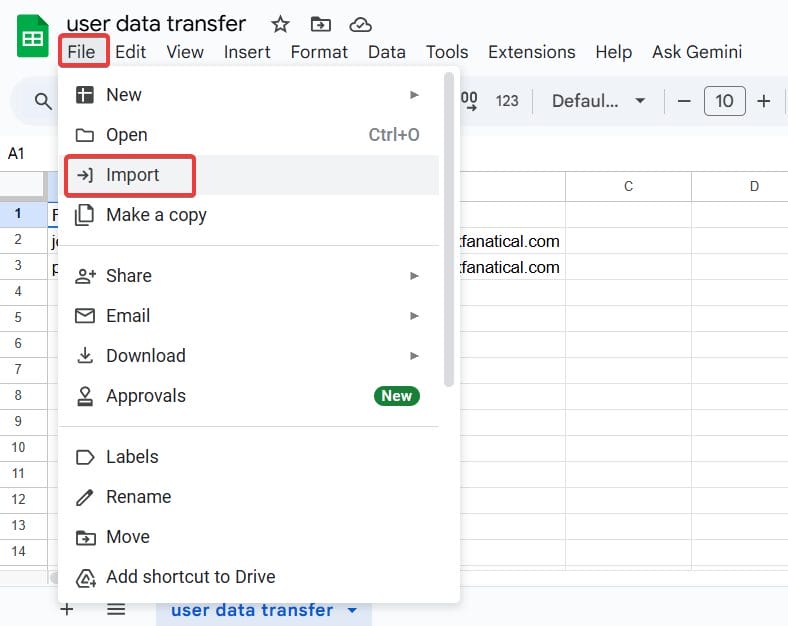
How to Import CSV into Google Sheets
- Open an empty Google Sheet.
- Go to File > Import.

- Select the CSV file you want to import.

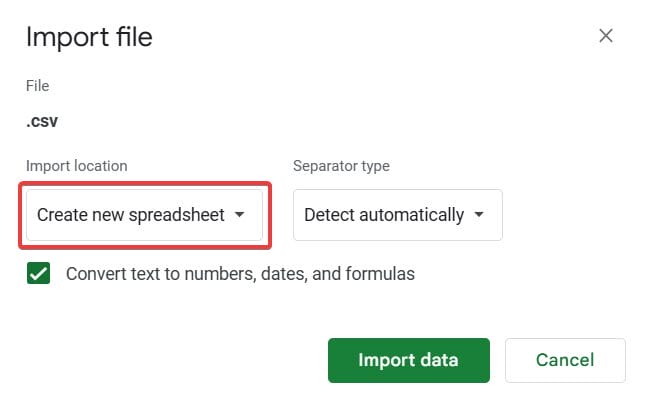
- Now, go to the Import location drop-down menu and select the Append to current sheet option.

- Then click the Import data button.
- You can see your Google Sheet having the imported data.

How to Edit a CSV File in Google Sheets?
Follow the procedure given below to open and edit the CSV file:
- Open the CSV with Google drive.
- Use the drop-down menu to Open the CSV file in Google Sheets.
- The Editor will open with a Google Sheet that includes your CSV data. In the editor, you will find several editing options and formatting options available for the CSV file.
- Upload the .csv file to Google Drive.
- Right-click on the uploaded file and select Open with > Google Sheets.
- The CSV will open in a Google Sheets and edit values as needed.
- Make changes by correcting data, adding rows or updating fields.
- Once done, go to File > Download > Comma-separated values (.csv) to save it back as a CSV.
- Use the downloaded CSV file for importing into external systems or applications.
How is xFanatical Foresight Helpful to Export Google Sheets to CSV?
xFanatical Foresight is an no-code automation tool that will streamline all your admin operations with Google Workspace. With xFanatical Foresight admins can import or export active or suspended users list, disabled devices or group members list. You need to have coding knowledge to use xFanatical Foresight features. It uses actions and triggers to perform export or import Google Sheets tasks.
How to Bulk Export User Data as CSV with xFanatical Foresight
Let’s take an example of exporting all active users' lists.
- Log into xFanatical Foresight.
- Go to the Rules and click on the
 button.
- Click the Manual trigger.

- Select List user action to list user data in CSV file.

- Grant the necessary permissions to access your Google Workspace account.

- You get notifications about the rule execution.

- Now, go to Logs page to download CSV file from the link provided.

- You have can have a look at the CSV file uploaded to Google Sheets.


Bulk Upload CSV to Google Sheets with xFanatical Foresight
xFanatical Foresight allows to perform actions by uploading CSV files. For example - It can automate the bulk suspension of users' in the Google Workspace.
Follow the rule setup instructions -
- Initially, prepare a CSV file with 2 columns - Email, New Status. In the Email column, add the user emails. In the New status column, add the Suspended status. Download this Google Sheet as CSV.

- Log into xFanatical Foresight. Go to Rules and click on the at the bottom right corner.
- In the Select a trigger screen, select the Data uploaded trigger.

- Click on the upload box and upload the downloaded CSV. Wait for the CSV to be parsed. You will see the columns of the CSV appear.

- Click Next.
- Select Suspended Users action. Grant permission to xFanatical Foresight.

- In the Primary email field, select the primary email variable from Data uploaded trigger.

- Click the Review button and enter the Rule name. Then click Create.

- Now the rule is created. Click on the Upload icon on the rule. Upload the same CSV file once again and the rule will be triggered.

- Wait until you receive notification on the top right corner of the page.


- You can confirm the successful execution within the Google Admin Console. You can see the list of suspended users by the automation.


Important Notes
Consider the following points to import and export of CSV with xFanatical Foresight.
- You can use Manual trigger to export CSV and Data Uploaded trigger for importing CSV file.
- You can not upload more than one CSV file at a time while creating or after creating the rule.
- You can reuse the rule to upload different CSV files.
- If the data exceeds 1000 rows, then the main CSV will split into smaller CSV files.
Conclusion
In conclusion, exporting Google Sheets as CSV is a valuable skill for better data management. This guide educates you on how to save Google Sheets as CSV file, import or export CSV files and how xFanatical Foresight can be used to streamline import export tasks. By following the guide you can know more about bulk operations using Foresight tool and edit Google Sheets.
To explore more automation rules, try a 14-day free trial of xFanatical Foresight.